Friday 31 January 2014

Part 3 Stage 2 Workshop 2

Knitted net

I am a lifelong knitter and pretty confident about it.  However, I've always used a pattern and followed advice about tension, yarns, needle size etc.  Now I have to forget all that and I think it might be a bit of a challenge.

I looked at ways that I could knit net and started with just plain garter stitch.  I used 8mm needles and a single ply cotton yarn with a shiny thread running through it.  To this I added some .2mm purple copper wire.

This combination gave an open mesh that was able to hold any shape I bent it to.


Mesh knitted with cotton and wire

It held it's shape well


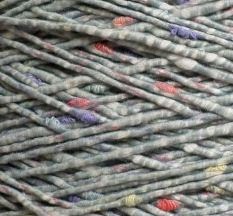
I've recently bought one or two quite lovely yarns from Linton Tweeds and I decided to try one out in my next net. 

I selected a boucle with a white cotton core which has been tightly bound with a pale grey/blue yarn which also has multi colour slubs in soft colours of lilac, yellow, pink and blue. The binding yarn does not cover the whole of the core.


Chicken wire net

This is a 4 row pattern that ends up looking like chicken wire.  I knitted on 8mm needles and it's pretty useless for any type of clothing at that tension.  It presents some lovely effects when it's scrunched up:

Chain mail knitting

It looks quite disorganised when held up to the light.


I find it amazing that such variety and complexity is just the twisting of yarns.

Having used big needles and fine yarns I found myself curious about what would happen if I tried the opposite; small needles and thick yarn.  I used 3mm needles and some hefty synthetic yarn that I know nothing about having inherited it from somewhere or other.

I wanted to use the same pattern as for the previous net but I found it impossible to get the thick yarn through the small spaces offered by 3mm needles.  Instead I used just yfd, k2tog.  It was tough going. 

3mm needles and hefty yarn
I got a sample that looked a bit like a rug, very dense, serviceable and quite attractive.  And it still looks net, albeit very hefty.

A bit of a change now.  I've used a variety of alternative yarns, garter stitch and 8mm needles in the next sample. There's tape, plastic bag, satin ribbon, organza ribbon, jute and paper. I managed to do what the course notes told me and ignored the rules.  I knotted my yarns, ignored tension  and generally created eclectic mayhem.


An eclectic mix


For years I've followed knitting instructions blindly and questioned nothing.  Now I find myself wondering "what if" and my next sample tries to answer some of these questions.

I used a mohair wool and began by making 20 stitches on 2.75mm needles.  I knitted 10 rows in stocking stitch (I used 10 rows throughout this sample).  This rolled nicely.

Stocking stitch 2.75mm, garter stitch 4.5 mm, stocking stitch 2.75 mm

I followed it up with 10 rows of garter stitch on 4.5 needles and a further 10 rows of stocking stitch on 2.75 needles.

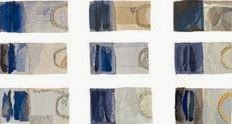
Next I did 10 rows of garter stitch on 6mm needles,  10 rows garter stitch on 2.75 needles, 10 rows garter stitch on 8mm needles and finally 10 rows reverse stocking stitch (2.75) to create a reverse roll.


Playing with tension and stitch

I've always known that after knitting rib the needles are changed to make  a looser stitch.  This experiment really highlighted the extent of this.  The 2.75mm needles pulled in the looser tension. The stocking stitch was less fuzzy than the garter stitch.  I'd expected the 8mm needles would produce a more net like fabric but I suppose the mohair fibres reduce the spaces between the stitches.


I've tried finger knitting not knowing quite what to expect.  I used sari silk simply because I love it.

Finger knitting with sari silk

With more regular yarn this would show two chains of stitches along the front and one down the back.  The sari silk just looks a gorgeous, extravagant jumble.

A silky jumble


I also tried French knitting.  I used a grey 4 ply wool and did one and a half metres.

French knitting
.
This is very easy to manipulate into all sorts of shapes. The photo shows just a series of simple, single knots.  It's just short of a necklace size.

Knotted French knitting
I made another in a variegated wool then pulled it up with it's end threaded through the middle.  It looks like the Very Hungry Caterpillar met a rainbow:

French knitting pulled up tight


Close up showing the twist in the knitting

I released the tension and played with the two cords together:

A chain


Using single overhand knots


It made a 3D structure


These shapes have all sorts of recesses and hidden places. Wired through the middle has great possibilities to open up the structure but I'm not trying it just yet.  It might be better with shorter lengths.

Whilst I've been researching this section of the course I found references to Mary Walker Phillips.  
Mary was born in California in 1923 and died in 2007.  She was a teacher, author but first and foremost a knitter.  In the foreword to her book Step by Step Knitting Jack Lenor Larsen, a designer, said
she is the great knitter of our time. She has taken knitting out of the socks-and-sweater doldrums to prove that knit fabric can be a blanket, a pillow, a piece of art ... she demonstrates that knitting is a creative medium of self-expression.
http://en.wikipedia.org/wiki/Mary_Walker_Phillips


Knitting as an art form Mary Walker Phillips


Interesting sites to visit:

http://webs-of-intrigue.co.uk/
http://www.lintondirect.co.uk
http://www.ukhandknitting.com/register_of_knitting_artists.php#Shane


http://en.wikipedia.org
Tellier-Loumagne, F.  2005, The Art of Knitting. Thames and Hudson. London

Wednesday 29 January 2014

Part 3 Stage 2 Workshop 1

Netting techniques

A net is:
an open-meshed fabric twisted, knotted, or woven together at regular intervals
http://www.merriam-webster.com/dictionary/net


It's some time since I got my Knotting Badge at Brownies and it seems I've forgotten everything I once knew anyway.  I can't even remember how to do Cat's Cradle and I've never tried macrame. 

The task here is to establish some dexterity in making nets; the necessary knots being a clove hitch and a sheet bend.

Once I got going it was OK but my real difficulty was tightening up the knots and keeping a consistent tension.  My knots were anything but regular.

My first material was a 3 ply jute.  This was tricky to manage because it didn't slide. I changed to cotton string and this was better and it was easier to get my knots neater although they wouldn't stand close inspection.  Because the string was smooth I thought I'd go a bit further down that line and try polypropylene string.  It was indeed smooth but an absolute nightmare to work with because it just didn't bend.

Set up and ready to go


After a few rows I found I was getting an unwanted twist
(and on the red I'd missed a loop)

After a row or two I noticed a twist had developed (see above).  I overcame this by changing my knotting from a left hand bias to a right hand one as I started a new row.

Completed using jute, cotton string and polyprop

I had no idea how to finish my work so I did something along the same lines as the beginning but it isn't very tidy.

I've been thinking about nets whilst I've been working and it seems almost as though it's just connected space.  There's more "hole" than yarn.  The comparative strength is quite remarkable; it has been used for millennia for catching large fish (and some drift nets are huge) yet a butterfly net is delicate. 

The net shopping bag is connected at fixed points so that it can move to accommodate whatever stress it is exposed to but then it can collapse and be put into a pocket.  LED lights can be supported in a near invisible net structure and look wonderful.  Remarkable.

I'm going to try some different materials to use this in a decorative way.  I love sari silk so I'll try that and I've some thoughts about cutting up carrier bags as well.


Later....
I looked again at my net and inspected the knots closely and found they were quite wrong.  I began again with a different yarn and while I got the knots right the tension was all over the place.  I'm going to leave this alone for a time and maybe come back to it later - right now it's just too frustrating.

I'm disappointed with my nets.
 A week later....
I hate to be beaten so I decided to return to this for another try.  I made frames from split bamboo (an old table mat) and filled the space with net made from just one ply of blue jute.  It was more successful than the work I did last week probably because there was the boundary provided by the frame.


I tried to taper the size of the net according to the taper on the frame.

I have a  lovely, useful book called "Three dimensional embroidery" by Janet Edmonds" (2009).  On page 66 there is a photo of a basic form coated with paper pulp so I thought I'd give it a try.  This really is becoming materials led.


Just dipped - quite revolting

The pulp dried to a hard coating that clung to the jute

The dried pulp was really very stable and looked like a well used fishing net.  I decided to do another frame in a different yarn and I chose a blue/green chenille.

Blue/green chenille


I laid one frame over the other:


...and then turned it over for a completely different effect.  Then I held it up to the light (I put tracing paper on the window):


The colour disappeared but the shapes intensified.  I decided to try a third frame using cut up carrier bags.

Using blue plastic bag


There are two major things I've learned from this; never offer to make anyone a fishing net and avoid making nets with plastic bags.  However, when I added the third frame to the pile (now 1.5 cm high) it changed the look of the whole thing.  I took photos of all the permutations I could think of and some were better than others.


This looks like a tangled mass of seaside netting and is far from beautiful.  But it is interesting - particularly in the way the three pieces can be combined to create different effects.

Against a tracing paper covered window

Without tracing paper


I don't feel that this is fully resolved and I may come back to some parts of the idea at some point.
Books I have found useful are Ruth Lee's "Three dimensional textiles" Janet Edmund's Three dimensional embroidery" and Stitch and structure by Jean Draper.

Draper J. 2013. Stitch and structure.  Batsford, London
Edmunds J. 2009. Three dimensional embroidery. Batsford, London
Lee R. ??? Three dimensional textiles. Batsford, London

Saturday 25 January 2014

Jilly Edwards

Jilly Edwards Tapestry at the Harley Gallery


Jilly Edwards
http://www.harleygallery.co.uk/


Today I paid a visit to the Jilly Edwards tapestry exhibition at the Harley Gallery.  It was very busy probably because Jilly was there to talk to the visitors.

The exhibition is called "Wanderlust" and depicts journeys long and short, that the artist has taken.
Visitors can unravel these journeys from their abstracted and recollected compositions. Bands of colour that suggest fields, or a delicate mark which hints at the trace of a fence,all give clues to the inspirations behind these works.
 http://www.craftscouncil.org.uk/
On display were some of Jilly's sketchbooks.  She makes many sketches and then watercolours before she starts working on a tapestry.  I love looking at sketchbooks especially when there are things like wrappings that I do as well.

Some of the work was very small, presented framed and hung in a series where the layout of the work was similar throughout.


Jilly Edwards
www.pinterest.com 

In the gallery these were in grey boxes and in one long horizontal line.

Some of the work was in shades of yellow.  The website (http://www.craftscouncil.org.uk/) tells me these are inspired by fields of oil seed rape.

From Wanderlust - Jilly Edwards
Photo - Jo Cook

From Wanderlust - Jilly Edwards
Photo - Jo Cook

Some of the work appeared to be stitched into with fine running or back stitches like the diagonal pairs of lines in the picture above.  There was lots of tonal work.....


Ma. 2002. 90 x 230cm - on plinth in front of Ma,
 A walk from Porthmeor to Zennor.
Date 2009. Size: 20 x 300cm.
Photographer: Robert Edwards.


..... and some pieces that were made up of long thin tapestries:


From Wanderlust - Jilly Edwards
http://www.harleygallery.co.uk/

The orange in this worked like a dream.  I also liked the asymmetrical aspect of some of the pieces.

Long thin pieces were plentiful, some almost like belts:


 Long tapestries coiled and viewed from above.


It was interesting to look at tapestry and feel that I knew about the techniques being used.  For instance I knew when a tapestry had been work on from the side.

One thing I really missed was information about the pieces.  Maybe it was left to the viewer to make their own stories but I would very much have liked to know more about the artists' inspiration and interpretation.


http://www.harleygallery.co.uk/